AI & Human Authenticity
How to Detect a Deepfake Video: Visual Clues and Free Tools
HAR Editorial Team

You watch a clip of a public figure saying something outrageous, and something feels off. Maybe the voice is a little flat. Maybe the face looks too smooth. Knowing how to detect deepfake video is now...
How to Detect a Deepfake Video: Visual Clues and Free Tools
You watch a clip of a public figure saying something outrageous, and something feels off. Maybe the voice is a little flat. Maybe the face looks too smooth. Knowing how to detect deepfake video is now a basic digital skill, and you can build it without technical training.
The short answer: watch the eyes, mouth, and edges of the face, then confirm with a free tool. If you want one way to spot a fake, check blinking and lip sync. Deepfakes often get both slightly wrong, especially when the head turns to the side or a hand passes in front of the face.
This guide walks you through the visual and audio warning signs to check by eye, such as lighting mismatches, odd skin texture, and robotic speech. Then it covers free online detection tools and how to read their results. At the Human Authenticity Registry, we advocate for consent-first digital identity, so we care about helping you verify what is real before you trust or share it.
What a deepfake video is and why it's hard to spot
A deepfake is a video, image, or audio clip that uses AI to make a real person appear to say or do something they never did. The name blends "deep learning" and "fake." Before you practice how to detect a deepfake video, you need to know what you are up against, because the fakes vary and each type leaves different traces.
The main types you will run into
Type | What it does | Where it usually slips |
|---|---|---|
Face swap | Puts one person's face on another person's body | Face edges, skin tone mismatch |
Lip-sync or reenactment | Rewrites mouth movement to match new audio | Teeth, mouth shape, timing |
Voice clone | Copies a voice from a short sample | Flat tone, odd breathing, no room noise |
Fully synthetic | Generates the whole scene from a text prompt | Hands, text, background physics |
Many viral clips combine two types, such as a face swap paired with a cloned voice. That is why the later steps check both picture and sound instead of trusting either one alone.
Why deepfakes fool people
Modern generators learn from thousands of frames of real footage. Public figures are easy targets because hours of interview video already sit online. Newer diffusion models also make far fewer obvious errors than the early face-swap apps, which often left a visible seam around the jaw.
Platforms make it worse. Social apps compress and resize every upload, and that blurs the exact artifacts you would look for. A small, vertical, low-resolution clip on a phone screen hides a lot.
Your own brain helps the fake along. We trust a familiar face and a confident voice, and we watch fast while scrolling. Speed is the forger's best ally, so slowing down is your first defense.
Why one test is never enough
Detection is an arms race. Every time researchers publish a tell, such as unnatural blinking, generator makers train it out of their models. Automated detectors lag too, since a tool trained on last year's fakes can miss this year's. So if you ask what is one way to detect a deepfake video, the honest answer is that any single method will fail eventually, and you need several.
No single clue proves a video is fake, but several small clues together are very hard to explain away.
The method in this guide is layered. You check the source, the face, the scene, the audio, then run a tool, and finally verify the claim. Each step takes a couple of minutes, and together they catch most of the fakes you will realistically meet.
Step 1. Pause and check the source first
Before you study a single pixel, stop and look at where the video came from. This is the cheapest part of learning how to detect deepfake video, and it often settles the question in under a minute. Your eyes come later. Context comes first.
Ask who posted it and why
Start with the account. A brand-new profile, a handle ending in random numbers, or a page that posts only outrage clips is a red flag. Check when the account was created and whether it ever shared original material before this clip.
Then ask whether the story makes sense. If a president, CEO, or celebrity really said something shocking, major news outlets and official channels will report it within minutes. Silence from them is a clue. So is pressure in the caption, such as "share before it gets deleted." Urgency exists to make you act before you think.
A video with no traceable origin deserves doubt, no matter how real it looks.
Run a 60-second source check
You do not need special software for this. Work through the list in order and stop as soon as something does not add up.
Open the poster's profile and check its age, post history, and bio.
Search the speaker's name plus a key phrase from the clip in a news search.
Visit the speaker's official accounts and look for the same statement.
Screenshot a clear frame and run it through Google Lens to find earlier copies.
Scan the comments for the original upload, but treat comment claims as leads, not proof.
Find the original upload
Many misleading clips are cropped from longer videos. Finding the earliest copy shows you what was said before the edit. If the oldest version sits on a parody account or an AI art page, you have your answer. If it shows the same room with different words, you have found the manipulation.
Also check the date. Old footage is often recycled with a new caption, which is not a deepfake but misleads just as well. Write down what you find, because the same notes will help in Step 6 when you decide what to do next. If you cannot trace the clip to any credible origin, treat it as unverified and move on to the visual checks.
Step 2. Study the face and skin for visual glitches
Once the source check leaves you unsure, move to the face. This is the core of how to detect deepfake video by eye, because the face is where generators work hardest and slip most often. Pause the clip, go full screen, and play it at half speed. Judge one feature at a time, since your eye cannot track everything at once.

Eyes and blinking
Eyes tell you a lot. Most people blink 15 to 20 times a minute. Early fakes blinked too rarely, and newer ones often blink at perfectly even intervals or with eyelids that do not quite match.
Reflections help too. Look at the small bright spots in each pupil. In real footage both eyes reflect the same light source in the same shape. If one eye shows a window and the other shows nothing, be suspicious.
Mouth, teeth, and jawline
Mouths are hard to fake. Teeth often blur into one white strip with no gaps between them, and the tongue may barely appear. Watch the lips on "b", "p", and "m" sounds, which need a full closure. If the lips never quite meet, the mouth was likely rewritten.
Skin, hair, and face edges
Skin comes next. Real faces show pores, fine lines, and uneven color. A fake can look waxy, or the face can seem a different age than the neck. Then check the edges. Ask the person to turn their head, or wait until they do, because fakes break first at side angles.
When the head turns, a real face stays solid and a fake one shimmers.
Use this table as a quick checklist while you scrub through the clip.
Area | Looks natural | Looks suspicious |
|---|---|---|
Skin | Pores, fine lines, small blemishes | Waxy, airbrushed, mismatched with the neck |
Hairline | Individual strands, soft shadows | Fuzzy halo, flickering strands |
Jaw and ears | Sharp, stable edge | Wobble or blur during head turns |
Glasses | Steady reflections, rigid frames | Frames that bend, fade, or lose reflections |
Finally, jot down every glitch you find and the timestamp. One odd blink proves little. Three glitches in the same ten seconds are a pattern worth taking to the free tools in Step 5.
Step 3. Check lighting, motion and background
A convincing face can still sit inside a scene that does not add up. This step of how to detect deepfake video moves your eyes off the face and onto the scene around it. Generators pour their effort into faces, so the physics of the room often gets less care. Keep the clip at half speed.
Lighting and shadows
Light is hard to fake because it has to stay consistent everywhere. Find the main source, such as a window or lamp, then check that shadows fall the same way on the face, neck, and nearby objects. A face lit from the left on a body lit from the right is a classic face-swap giveaway. Also watch for brightness that shifts when the head moves while the rest of the frame stays steady.
Do the shadows under the nose and chin match the room?
Does the skin tone on the face match the neck and hands?
Do glasses, earrings, or watches reflect the same light as everything else?
Motion and body movement
Next, watch how the person moves. Real heads, shoulders, and hands move together with small natural delays. In a fake, the face may glide while the neck and shoulders stay stiff, as if the head were pasted onto a body that barely shifts. Gestures can also look looped or oddly limited.
Hands deserve special attention. When a hand or object crosses the face, many fakes flicker or erase the fingers for a few frames. Count the fingers, check that they bend at real joints, and look for blur that does not follow the motion.
Anything that passes in front of the face is a stress test, and fakes often fail it.
Background and objects
Finally, scan the background. Fully synthetic scenes tend to warp straight lines. Door frames bend, tiles drift, and text on signs or screens turns into gibberish. People in the back may morph or blur, which real footage rarely does.
Then compare sharpness. If the face is crisper or softer than everything around it, the face was probably added separately, because a real camera focuses on the whole subject the same way. Add each oddity and its timestamp to your notes from Step 2, since you will bring them to the detection tools in Step 5.
Step 4. Listen for audio and lip-sync mismatches
Sound is the half of a fake that most people forget to test, which is why deepfake audio detection deserves its own check. When you practice how to detect deepfake video, audio is often the weaker link, because cloning a voice and fitting it to a moving mouth are two separate problems. Watch the clip once with the sound on. Then replay the same ten seconds with headphones in and your eyes off the screen.

Check whether the mouth matches the words
Start with timing. In real footage, lip movement and speech line up frame for frame. Look for a jaw that barely moves during loud, emphatic words, or a voice that runs slightly ahead of or behind the mouth. Compression can add a small, constant lag, so the real warning is sync that wobbles within a single sentence.
Listen for what a real recording contains
Next, judge the voice itself. Cloned speech often sounds clean but lifeless. Check for these cues:
A flat, even pitch that does not rise with excitement or anger.
No breaths, or breaths in odd places, such as mid-word.
Names, numbers, and acronyms pronounced in a stiff or slightly wrong way.
A metallic, watery, or clipped quality at the ends of words.
Dead silence between words, or a background hum that loops.
That last cue matters most. Real rooms have echo, traffic, and the faint noise of a microphone. If the person stands in a large hall but sounds like they are in a closet, the audio was probably added later.
A real voice sounds like it belongs to the room it was recorded in.
Compare against a known real recording
Finally, find an authentic interview of the same person and listen to the two back to back. Notice accent, pace, filler words like "um," and habits such as laughing or clearing the throat. A clone tends to skip these small habits, and it rarely changes speed the way a person does when thinking.
The same logic applies to voice messages, phone calls, and deepfake video calls. If a "relative" or "boss" asks for money or a password, hang up and call back on a number you already have. Then add any audio oddities and their timestamps to your notes, because the detection tools in Step 5 work best when you know which moments to test.
Step 5. Run the video through free detection tools
Now bring in software. Automated checkers work best after your own review, because you already know which timestamps to test. This step of how to detect deepfake video takes about five minutes, and free tools cover most everyday cases, though none of them gives a final answer.
Pick the right type of tool
Different tools answer different questions, so use more than one kind.
Tool type | Examples | Best for | Limit |
|---|---|---|---|
Upload scanner | Deepware Scanner, Hive AI detector | Quick score on a short clip | Struggles with heavy compression |
Browser extension | InVID-WeVerify | Splitting a video into frames | Needs manual work |
Reverse image search | Finding earlier copies | Shows origin, not authenticity | |
Provenance check | Google SynthID Detector, Content Credentials | Clips from AI tools that add watermarks | Says nothing about unmarked fakes |
Tools come and go, and some change from free to paid. Check that a tool is still maintained before you trust its score.
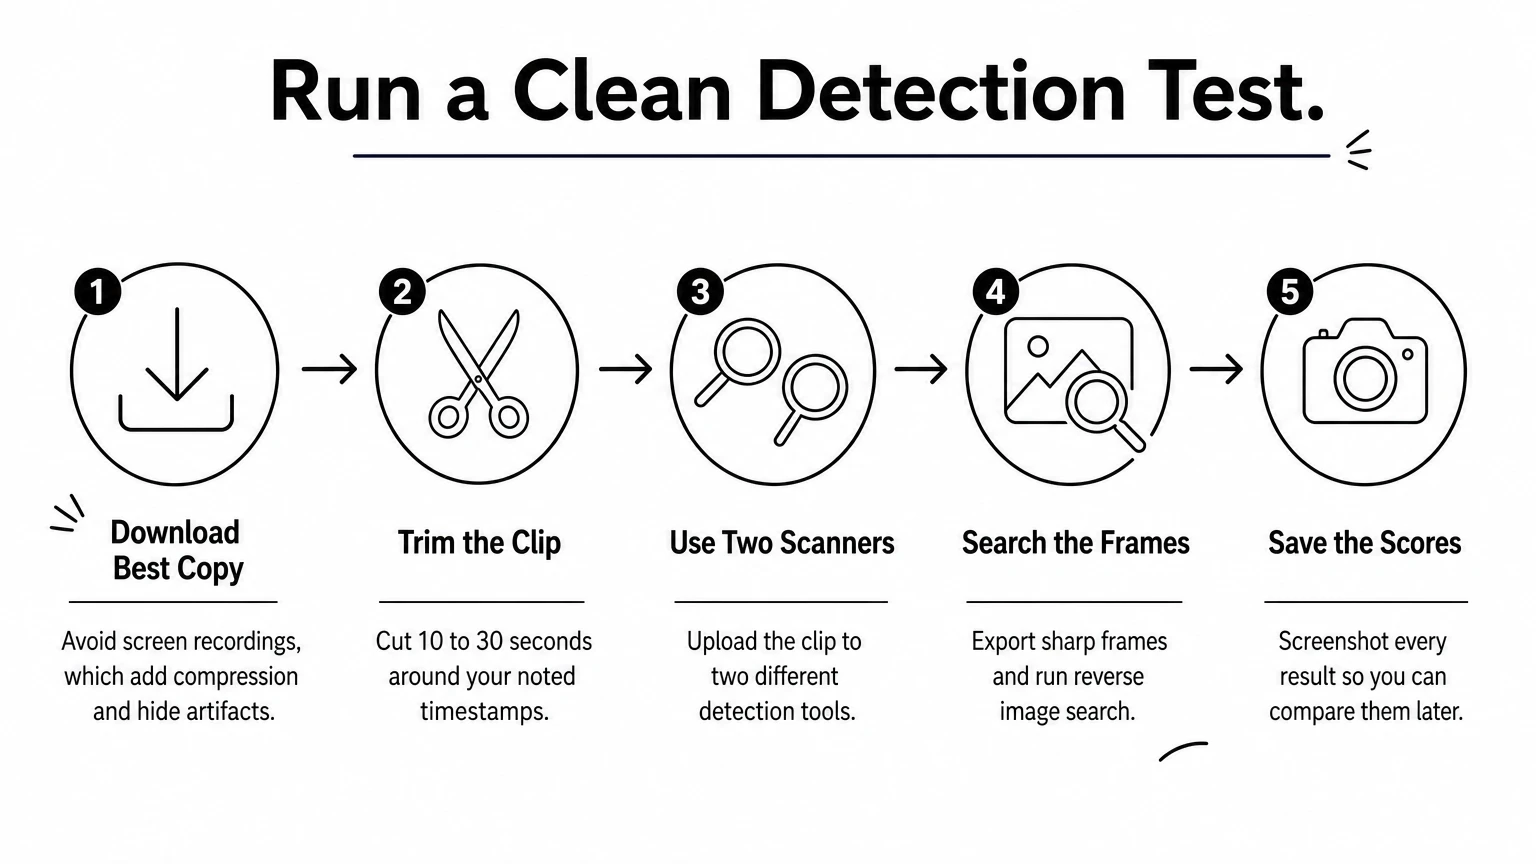
Run a clean test
Follow these steps for the most reliable result:
Download the best copy you can find. A screen recording adds compression and hides artifacts.
Trim 10 to 30 seconds around the timestamps in your notes, ideally with the face clearly visible.
Upload the clip to two different scanners.
Export frames with the browser extension and run the sharpest ones through reverse image search.
Screenshot every score so you can compare results later.
Read the results with care
A score is a probability, not a verdict. A result of "82% likely fake" means the model saw patterns it links to synthetic video. It does not prove a thing. Detectors also produce false positives on real footage that was filtered, cropped, or compressed.
A detector can raise your suspicion, but it cannot clear or convict a video on its own.
When tools disagree, trust the pattern, not the highest number. Two scanners flagging the same moments you already marked as odd is strong evidence. A "real" result on a clip with a shady source and a stiff voice should not reassure you. Models lag behind new generators, so a clean score is never proof of authenticity. Add the scores to your notes and take them into Step 6.
Step 6. Verify the claim and decide what to do next
Your notes now hold a source check, a list of visual and audio glitches, and a few detector scores. The last step of how to detect deepfake video is turning that pile into a decision. Make it before you react, because a verdict is only as good as the evidence behind it, and a wrong guess has a real cost for someone.
Weigh your evidence together
Count the layers that raised a flag. One weak signal means little, but flags that stack across independent checks are hard to explain away. Sort the clip into one of three groups:
Likely authentic: a credible origin, no repeated glitches, tools that agree, and trusted outlets carrying the same footage.
Unverified: mixed signals or no traceable source. This is the most common result, and saying so honestly beats guessing.
Likely fake: a shady source, several glitches in the same moments, and at least one tool flagging those same moments.
Confirm the claim, not just the pixels
Even a real video can mislead, so ask whether the event actually happened. Look for the same statement on the speaker's official channels, coverage from at least two independent news outlets, and a search of the claim on a fact-checking site. If a major event is real, many people will confirm it quickly.
If you cannot confirm the claim anywhere credible, treat the video as unverified, however convincing it looks.
Watch for false context too. A genuine clip with an invented caption, a trimmed quote, or a wrong date fools people just as well as a deepfake. Compare what you found in Step 1 against what the caption promises. If the original upload says something different, you have your answer.
Decide what to do next
Your action depends on the group you chose, but a few habits apply almost every time. Do not share a doubtful clip, not even to mock it, because reposts spread it further. Then pick the response that fits:
Report it through the platform's manipulated media or impersonation option.
Report scams to the FTC or the FBI's IC3 if the clip pushes you to send money or data.
Save evidence if the video uses your face or someone you know: the URL, screenshots, timestamps, and your notes. Then request a takedown.
Say "unverified" when you discuss the clip with friends or family, and share what you checked.
Keep your notes after you finish. A short record of what you checked and what you found makes the next review faster, and it shows others that your conclusion rests on more than a hunch.
Trust your eyes, then verify
Learning how to detect deepfake video comes down to a habit, not a trick. Check the source first, study the face, lighting, and audio, run a couple of free tools, and then confirm the claim. No single clue settles it, but clues that stack across independent checks rarely mislead you.
Your instincts are a good starting point. If a clip feels off, slow down before you share, and test that feeling with the steps above. Calling a video "unverified" is a perfectly good answer.
Fakes will keep improving, so the bigger question is how we establish proof of humanity and who gets to define what counts as real. At the Human Authenticity Registry, we believe people deserve a say on their own terms. If you agree, join the Human Authenticity Registry as a founding member and help shape consent-first digital identity.